Table of Contents
- Deployment
- Overview
- User Interface Walkthrough
- Developer Guide
- Community Feedback
- Development History
- Contact Us
Deployment
Click here for a running deployment of Study Dojo.
Overview
Study Dojo is a website that enables students to help learn from and teach their peers. Students can register as “sensei” for classes they willing to attempt to help and “grasshopper” for classes they are currently enrolled in. For each course they are registered as grasshopper, students can propose study sessions around a topic and a time. This notifies all grasshoppers and sensei for that course, allowing them to respond if they intend to attend the study session.
User Interface Walkthrough
Landing Page
When you first bring up Study Dojo, you’ll see a landing page that provides a brief introduction to the capabililties of Study Dojo:
 Click here for a running deployment of the Landing Page
Sign in Page
Click the green “Sign In” button to bring up a page for the user to sign into their account:
 Click here for a running deployment of the Sign In Page
Sign up Page
If the user doesn’t have an account, they can click on the blue “here” at the bottom to bring up the Sign Up Page to register their account:
 Click here for a running deployment of the Sign Up Page
Home Page
After signing in, the system will bring the user to their Home Page. The User Home Page is similar to the Landing Page, but their NavBar will be updated to allow the user to access several pages:

The Admin Home Page is nearly identical to the User Home Page with minor additions to the NavBar for Admin level features:
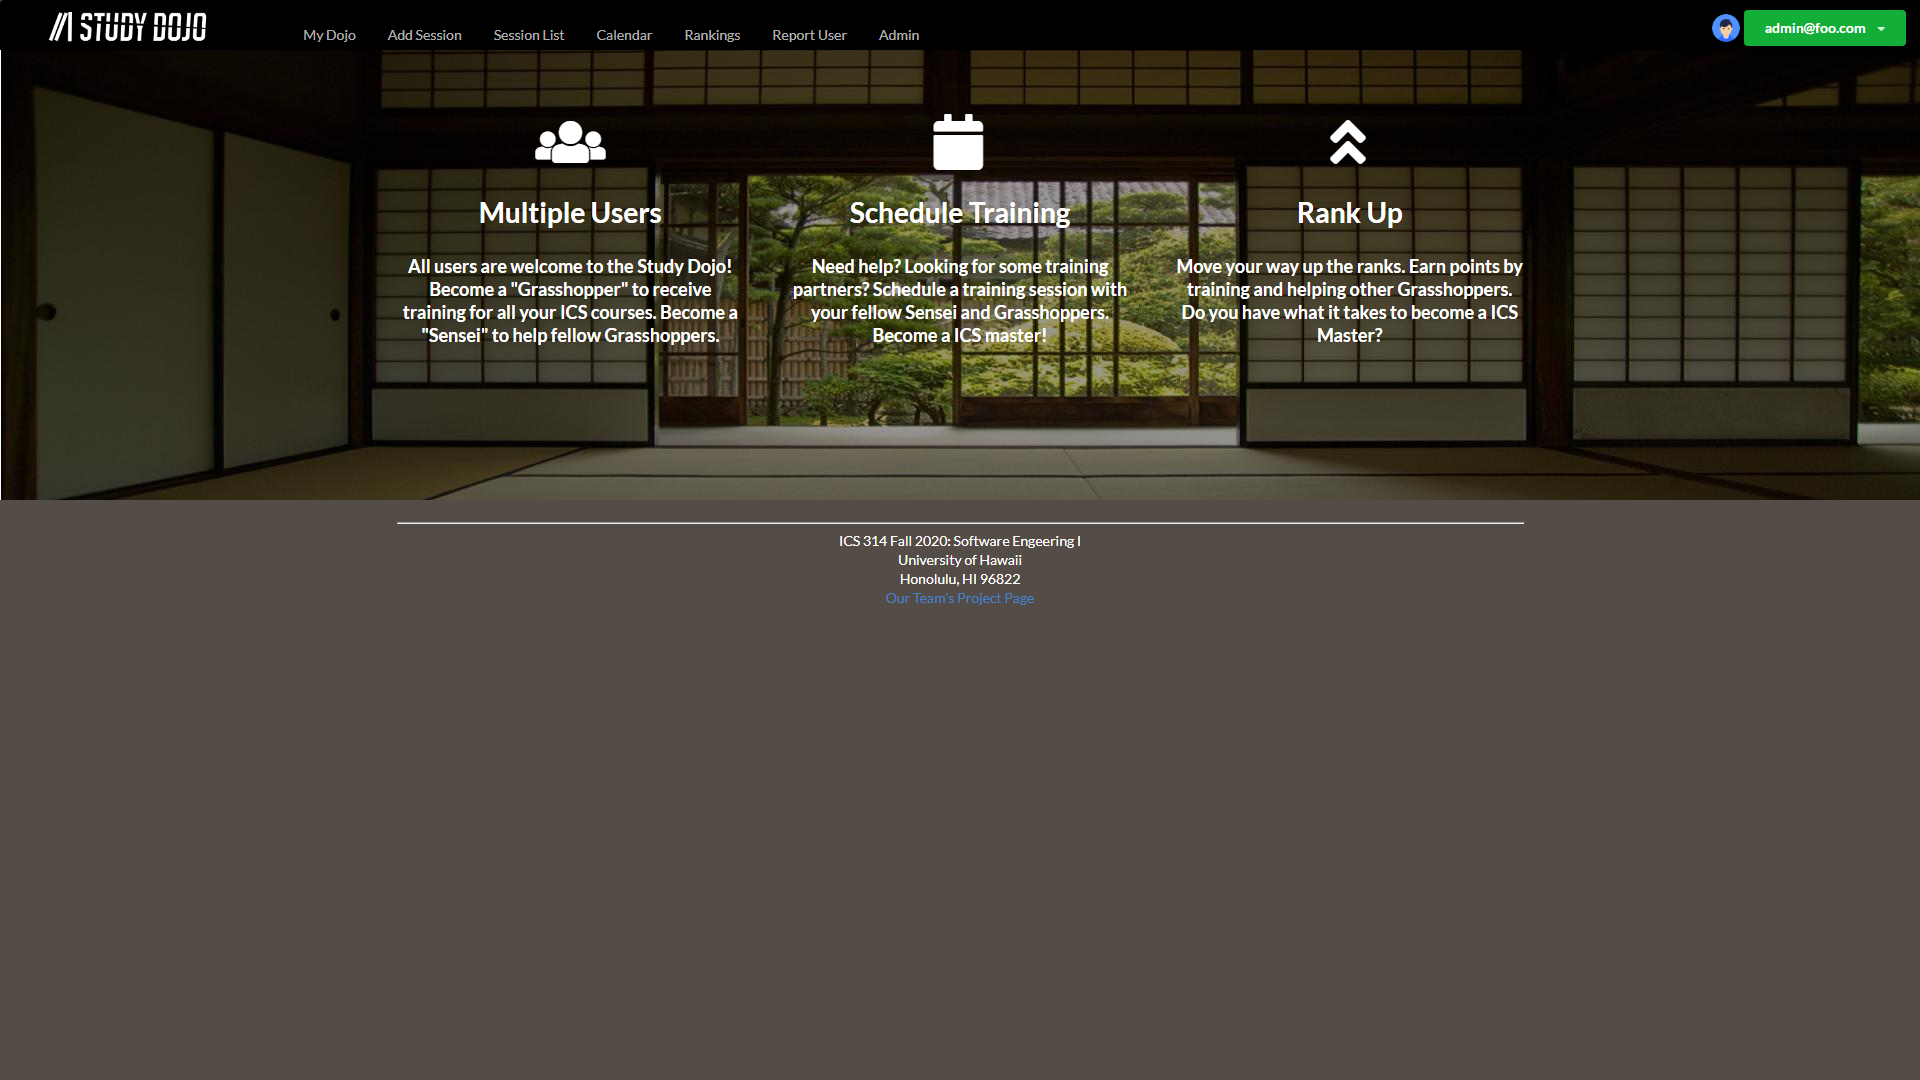 Click here for a running deployment of the Home Page
Profile Page
Clicking on the circular avatar (top right) will bring the user to thier personal profile page where they can see update their profile information and see their current rank:
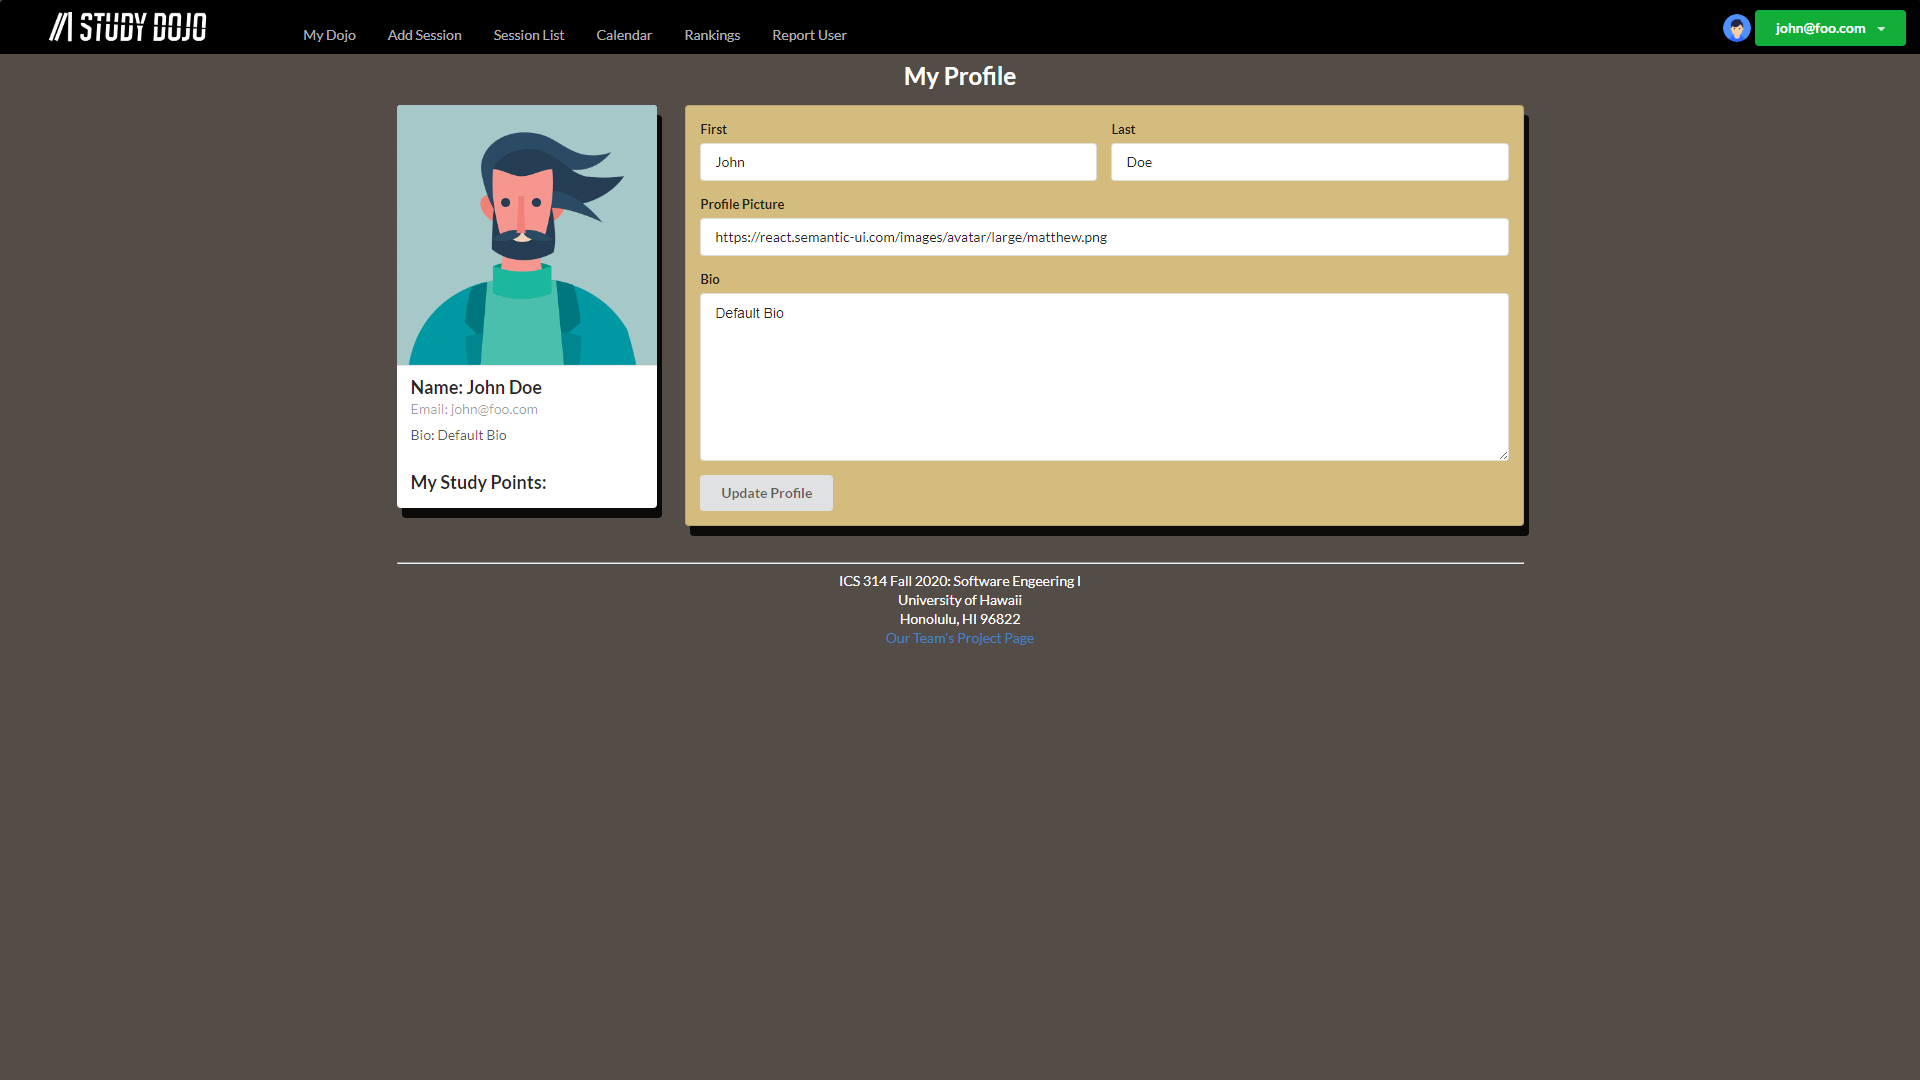 Click here for a running deployment of the Profile Page
My Dojo Page
Clicking on “My Dojo” will bring the user to a page to see the classes they are regsitered under as “Dojo” and their status, which is either “grasshopper” or “sensei”:
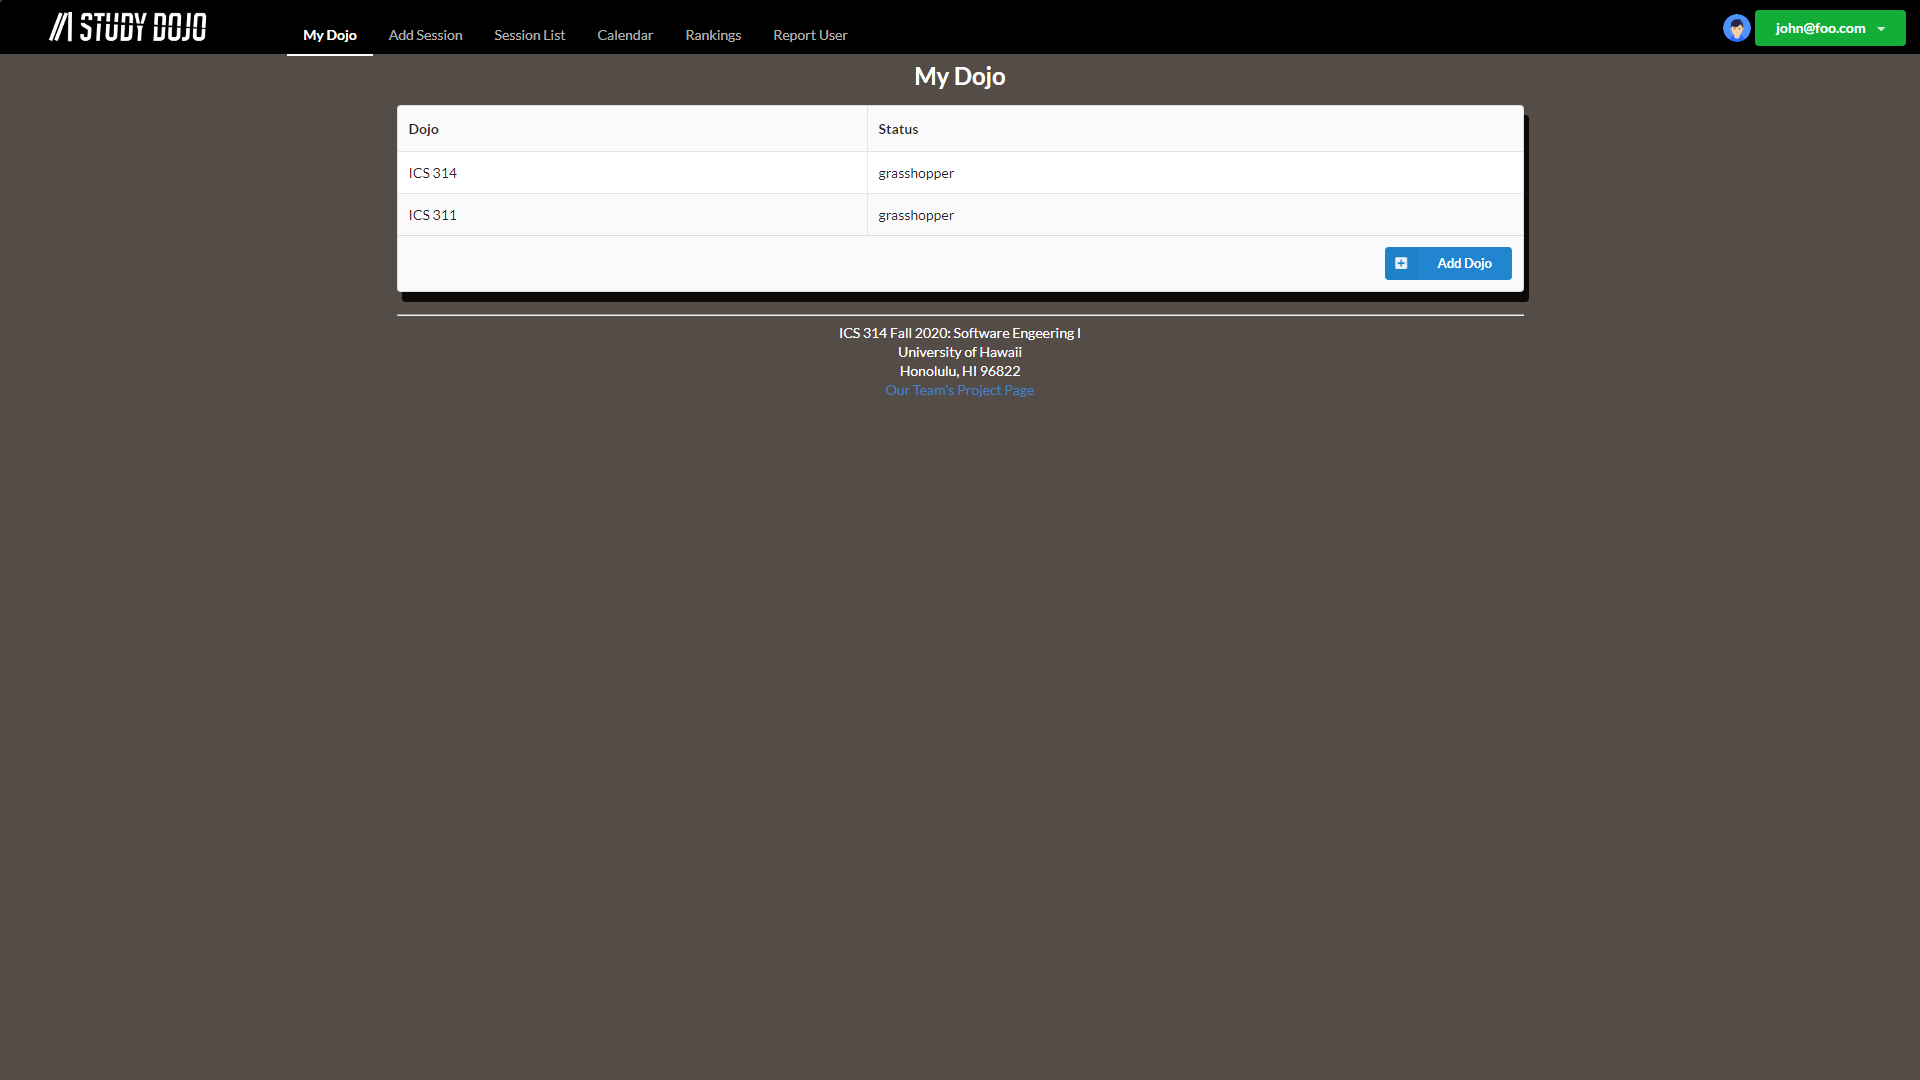 Click here for a running deployment of the My Dojo Page
Add Session Page
Clicking on “Add Session” will bring the user to a page where they can create a study session. The user can fill out the form to create a new study session. Users also earn 1 Study Point for creating a new study session:
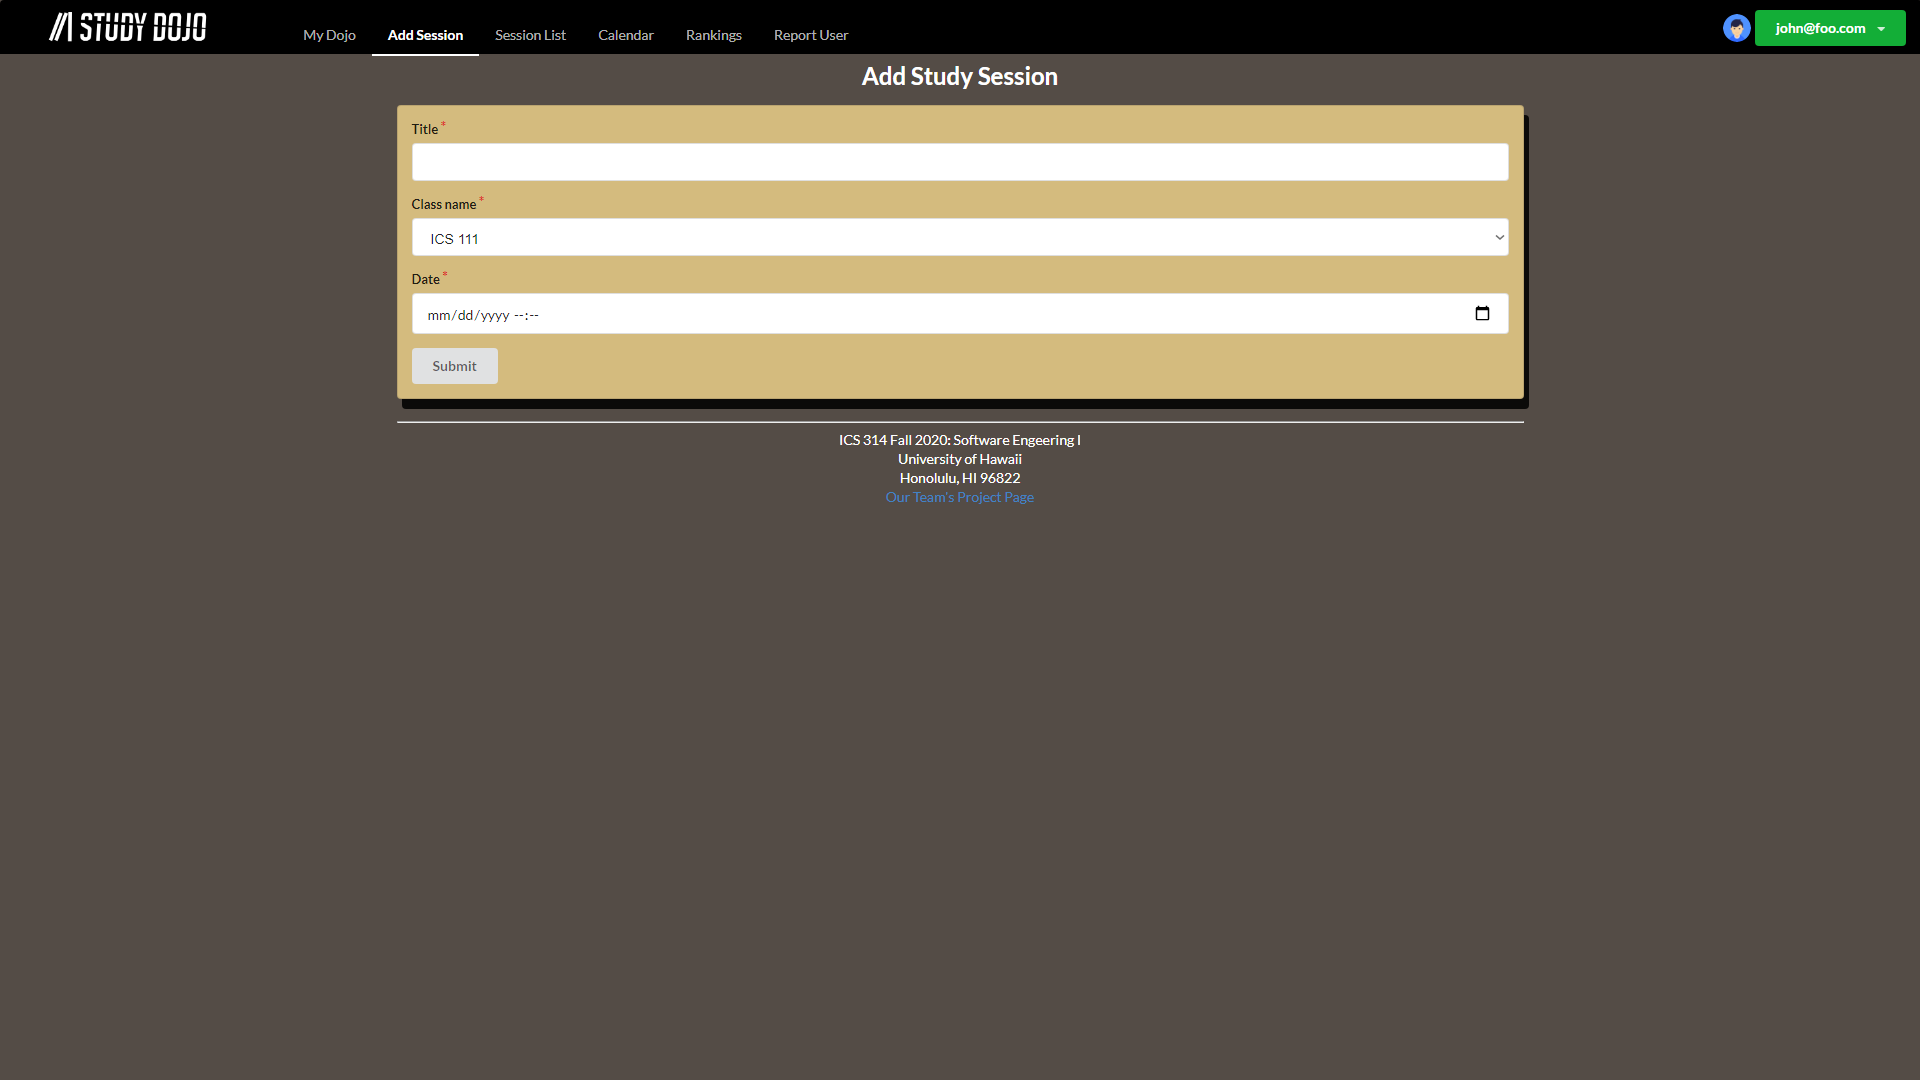 Click here for a running deployment of the Add Session Page
Session List Page
Clicking on “Sesson List” will bring the user to a page with all the study sessions they are currently registered for:
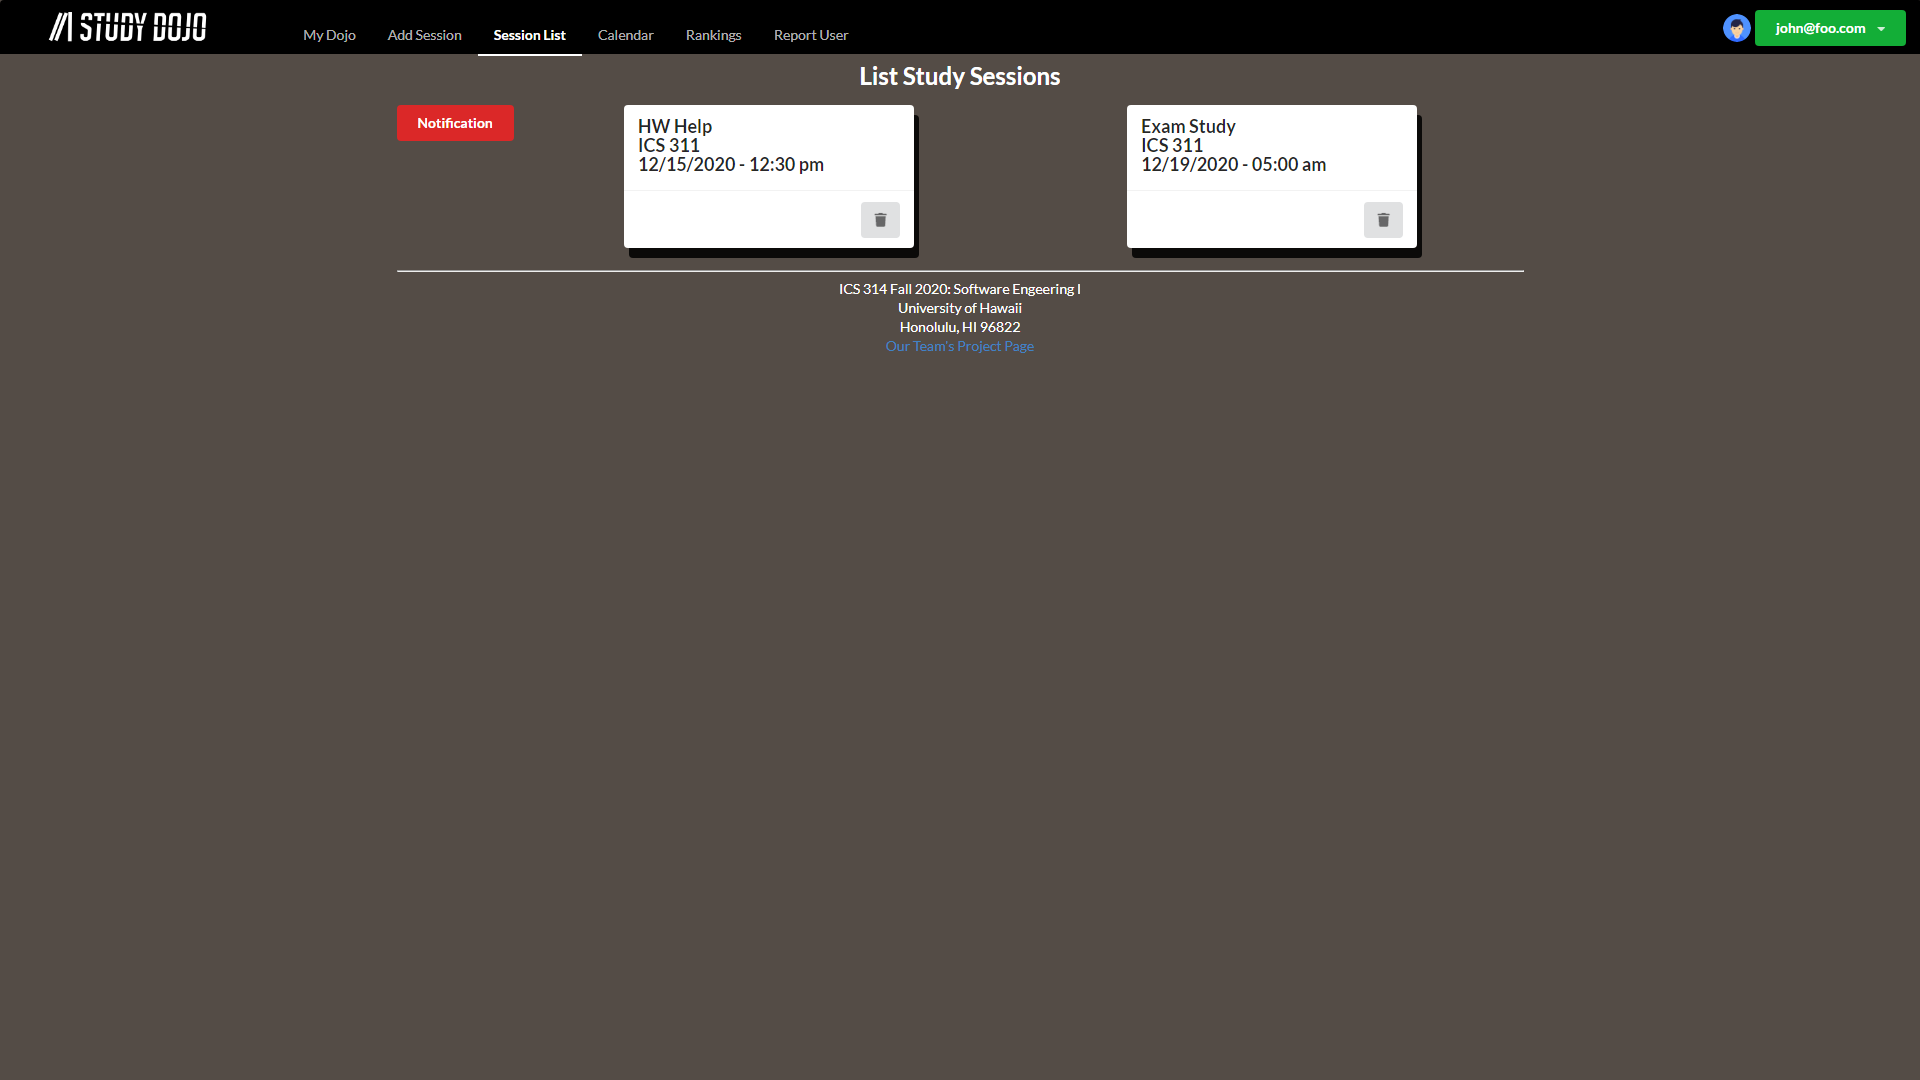 Click here for a running deployment of the Session List Page
Study Session Notification
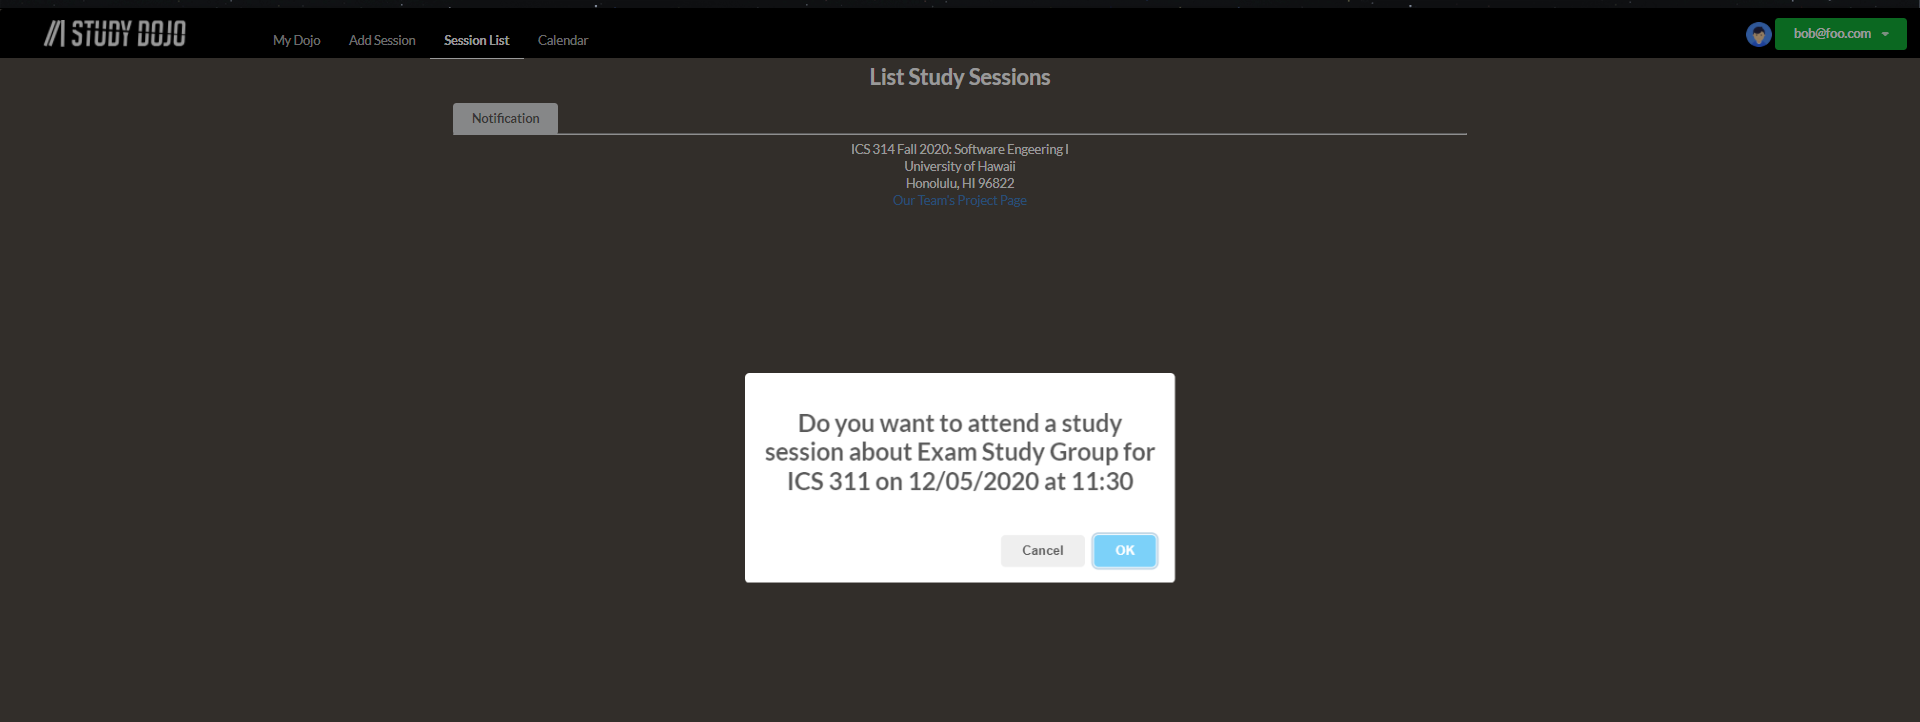
If another user created a study session for the same class you’re registered for, you can click the “Notification” button to get an alert asking if you want to attend the study session. Clicking “OK” will automatically add the study session to your Session List Page. Here’s an example of the alert:
Calendar Page
Clicking on “Calendar” will bring the user to a page with a calendar that is currently empty, but will be updated to show all the study sessions:

Clicking on an study session event in the calendar will display a pop-up about the study session:
 Click here for a running deployment of the Calendar Page
Rankings Page
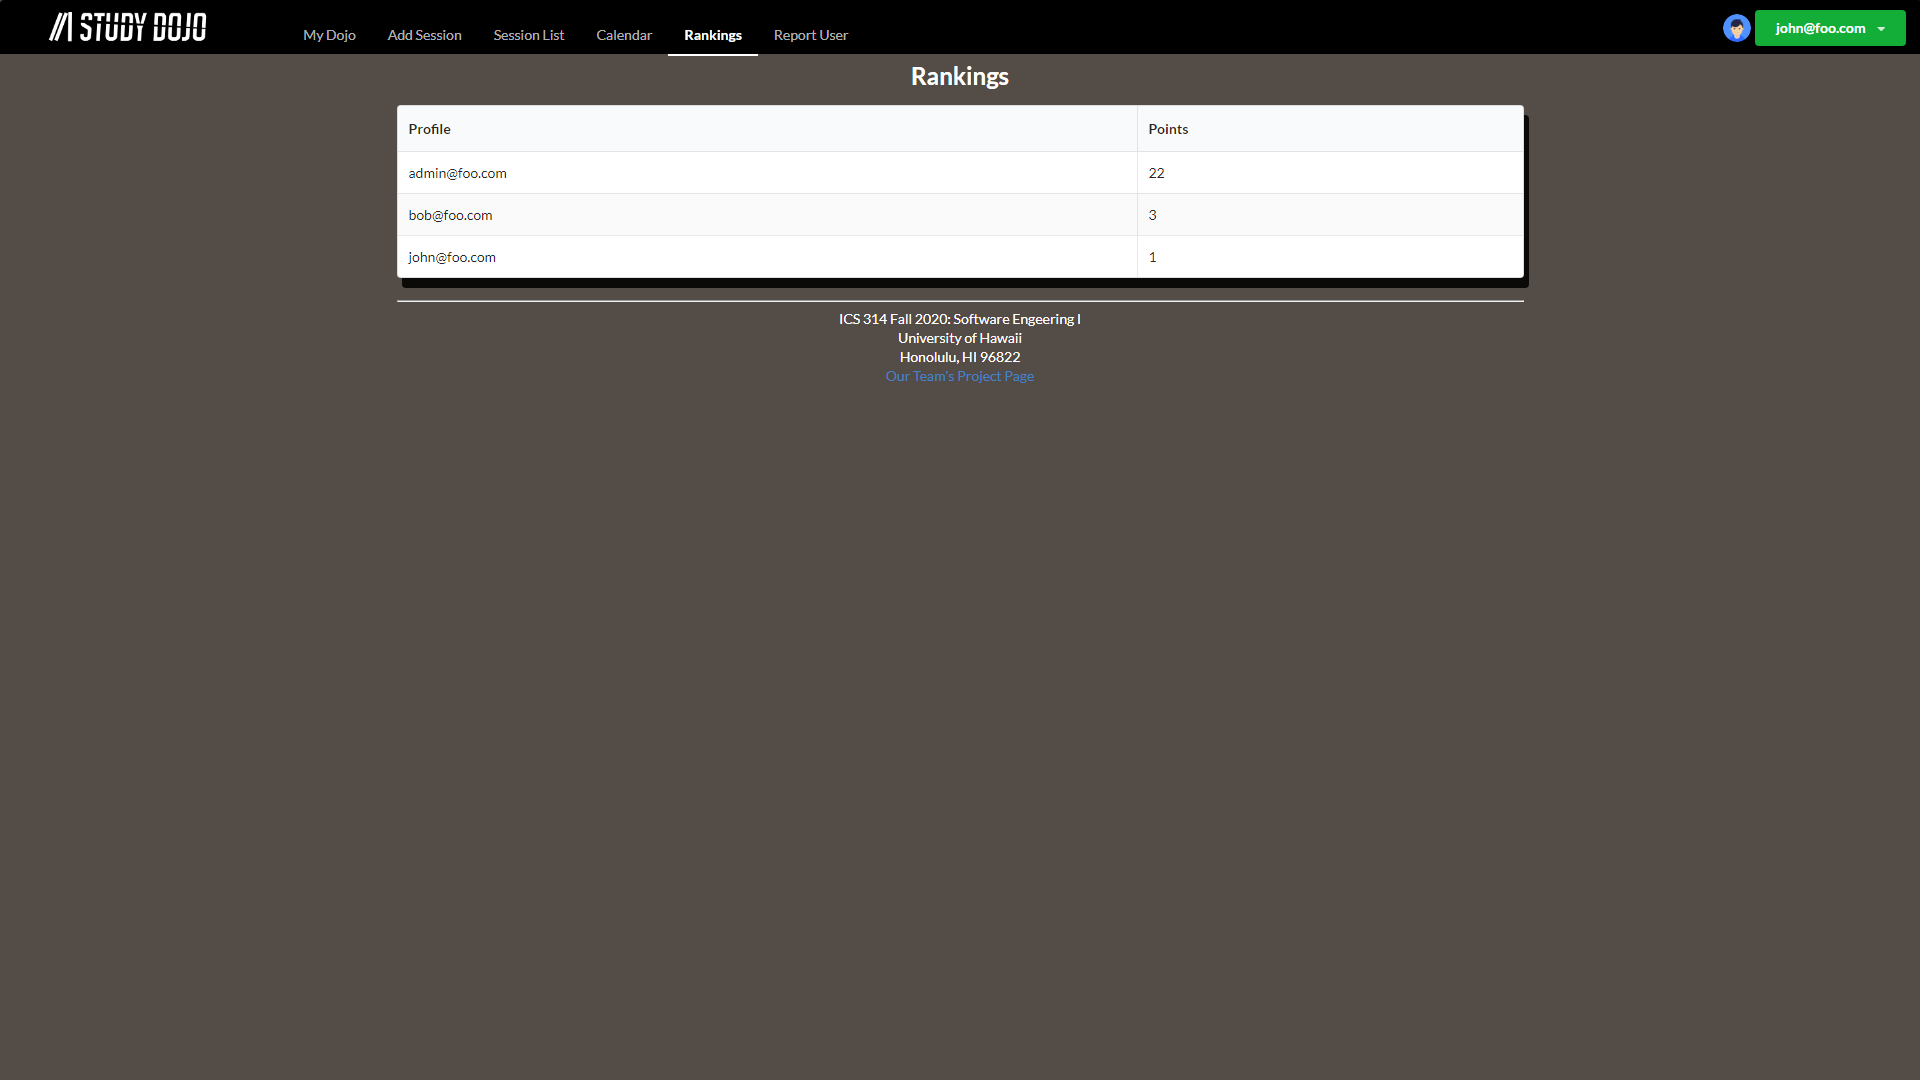
Clicking on “Rankings” will bring the user to a page to see a leaderboard ranking of Study Dojo users. Earn Study Points by creating study sessions:
 Click here for a running deployment of the Rankings Page
Report Page
Clicking on “Report User” will bring the user to a page where they file a report. Reports are used to prevent abuse to the Study Points system and other users. The user can fill out the form to report others for Harassment, Cheating, Spam, Offensive Content, and other misconduct.
 Click here for a running deployment of the Report Page
Reported Users Page (Admin)
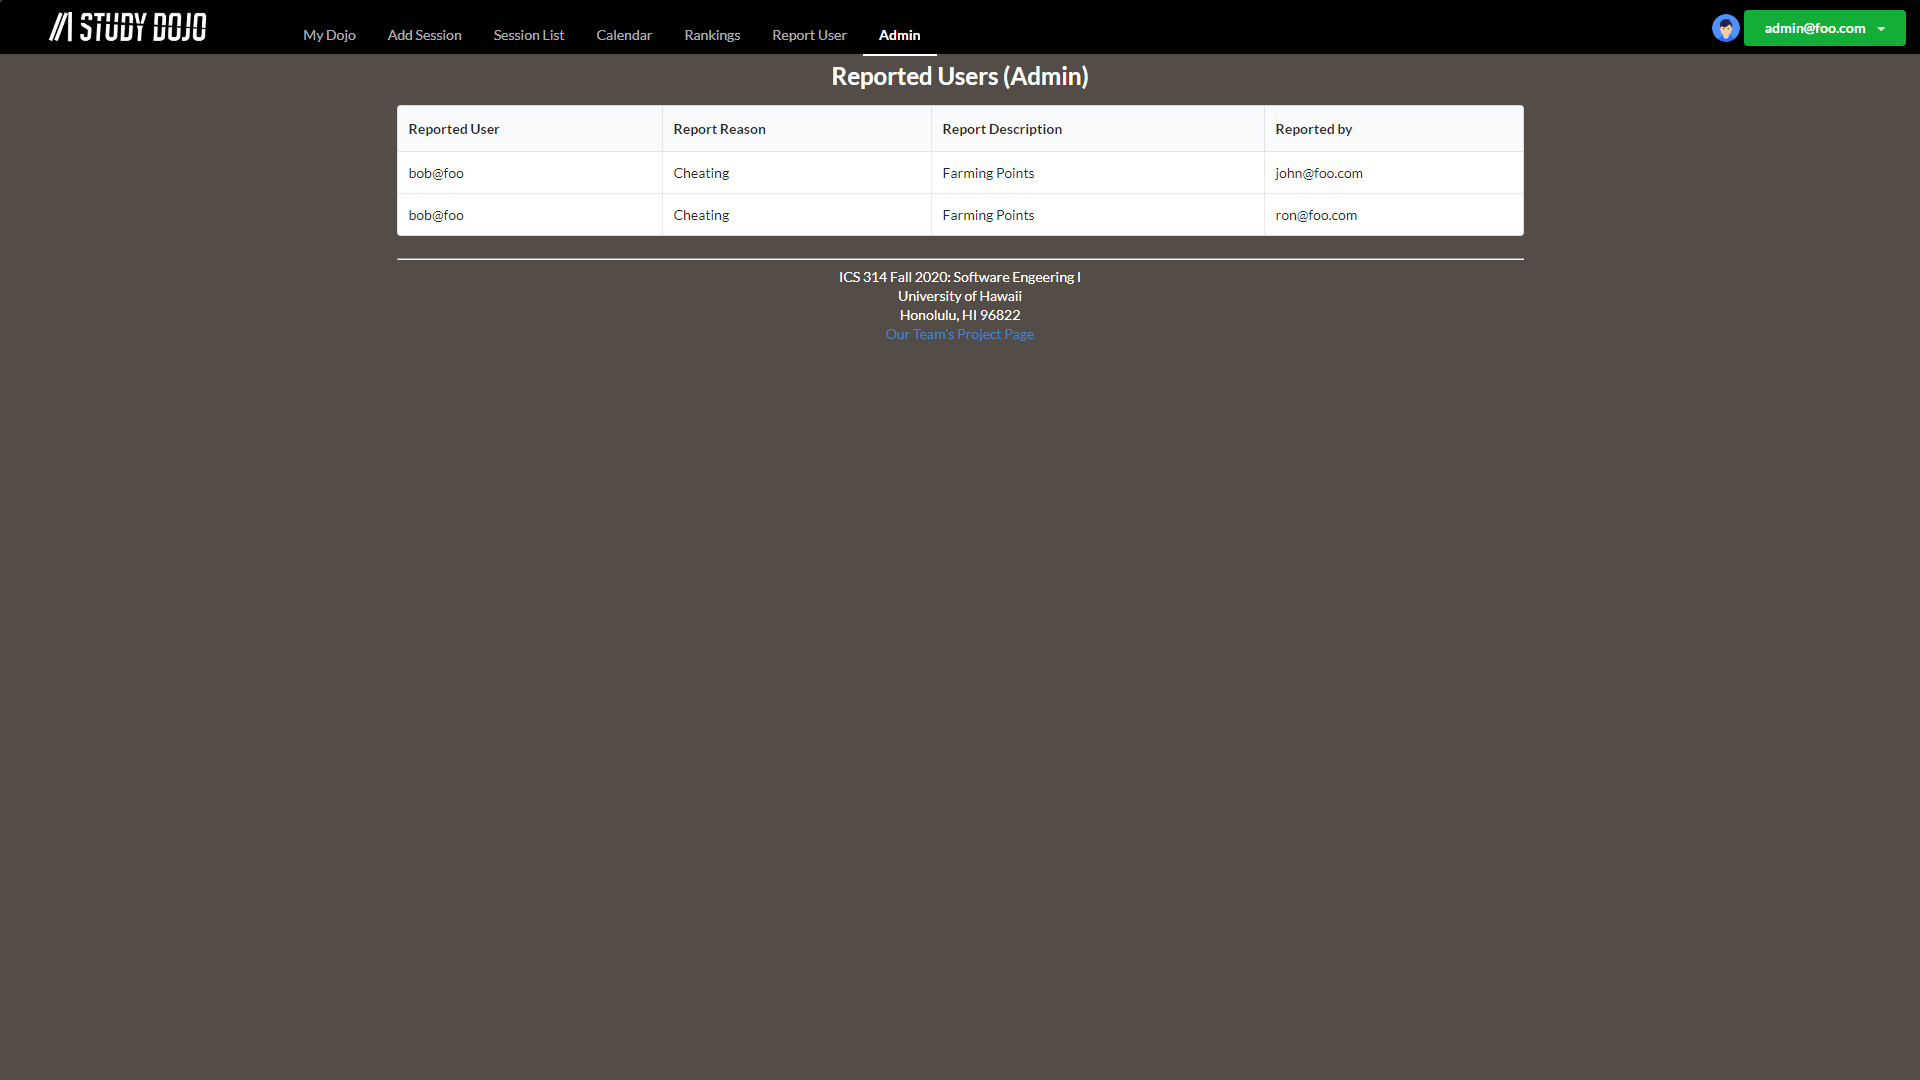
Admin accounts have access to the Reported Users Page by clicking on “Admin”. Here they can view all submitted reports from Study Dojo users:
Developer Guide
Installation
First - install meteor
Second - download a copy of study-dojo.
Third - cd into the app/ directory of your local repo and install third party libraries with:
$ meteor npm install
Running Locally
To run the app locally, invoke the following code:
$ meteor npm run start
The first time you run the app, it will create default users and data for the app. Here is an example:
$ meteor npm run start

> meteor-application-template-react@ start C:\Users\justi\OneDrive\Documents\GitHub\github\study-dojo\app
> meteor --no-release-check --exclude-archs web.browser.legacy,web.cordova --settings ../config/settings.development.json

[[[[[ C:\Users\justi\OneDrive\Documents\GitHub\github\study-dojo\app ]]]]]

=> Started proxy.
=> Started MongoDB.
W20201201-15:21:56.100(-10)? (STDERR) Note: you are using a pure-JavaScript implementation of bcrypt.
W20201201-15:21:56.518(-10)? (STDERR) While this implementation will work correctly, it is known to be
W20201201-15:21:56.519(-10)? (STDERR) approximately three times slower than the native implementation.
W20201201-15:21:56.519(-10)? (STDERR) In order to use the native implementation instead, run
W20201201-15:21:56.519(-10)? (STDERR)
W20201201-15:21:56.520(-10)? (STDERR)   meteor npm install --save bcrypt
W20201201-15:21:56.520(-10)? (STDERR)
W20201201-15:21:56.520(-10)? (STDERR) in the root directory of your application.
I20201201-15:21:57.477(-10)? Creating the default user(s)
I20201201-15:21:57.478(-10)?   Creating user admin@foo.com.
I20201201-15:21:57.685(-10)?   Creating user john@foo.com.
I20201201-15:21:57.852(-10)?   Creating user bob@foo.com.
I20201201-15:21:58.024(-10)? Creating default Study Sessions.
I20201201-15:21:58.025(-10)?   Adding: Help with HW (john@foo.com)
I20201201-15:21:58.040(-10)?   Adding: Exam Study (john@foo.com)
I20201201-15:21:58.043(-10)? Creating default dojo data.
I20201201-15:21:58.044(-10)?   Adding: ICS 314 (john@foo.com)
I20201201-15:21:58.065(-10)?   Adding: ICS 311 (john@foo.com)
I20201201-15:21:58.067(-10)?   Adding: ICS 311 (bob@foo.com)
I20201201-15:21:58.121(-10)? Monti APM: completed instrumenting the app
=> Started your app.

=> App running at: http://localhost:3000/
   Type Control-C twice to stop.
Note on pure-Javascript implementation of bcrypyt. The following message appears whenever you invoke meteor npm run start:
Note: you are using a pure-JavaScript implementation of bcrypt.
While this implementation will work correctly, it is known to be
approximately three times slower than the native implementation.
In order to use the native implementation instead, run

  meteor npm install --save bcrypt
On some operating systems (ex. Windows), installing Bcrypt is much more difficult than the message implied. Meteor only uses Bcrypt for password checking, so in practice, the performance implications are negligible until the site has very high traffic. You can safely ignore this warning during the initial stages of development.
The app should appear at http://localhost:3000. You can login using the credentials in settings.development.json, or register or a new account.
Deploying the App
The team behind Study Dojo uses Meteor Up to deploy our app. Install Meteor Up by invoking:
$ npm install --global mup
In the app/.deploy directory, you’ll find two files: mup.sample.js and settings.sample.json. Make a copy of these two files and call them mup.js and settings.json respectively. The .deploy directory should look like this:
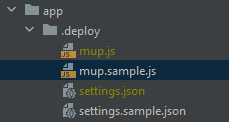
To change where the app deploys, you need to edit the mup.js file. It should initially look like this:
module.exports = {
  servers: {
    one: {
      host: '111.222.333.444',
      username: 'root',
      password: 'changeme'
    }
  },

  app: {
    name: 'meteor-application-template-react',
    path: '../',

    servers: {
      one: {},
    },

    buildOptions: {
      serverOnly: true,
    },

    env: {
      ROOT_URL: 'http://111.222.333.444',
      MONGO_URL: 'mongodb://mongodb/meteor',
      MONGO_OPLOG_URL: 'mongodb://mongodb/local',
    },

    docker: {
      image: 'abernix/meteord:node-12-base',
    },

    enableUploadProgressBar: true
  },

  mongo: {
    version: '3.4.1',
    servers: {
      one: {}
    }
  },
};
There are three occurences of study-dojo.me, these need to be changed to the new IP or domain name to change where the app is deployed.
Note for Window users, on instances of “mup”, use “mup.cmd” instead.
Deploy your app by invoking:
$ mup setup
Note STDERR You may get an error when trying to set up the proxy. That’s okay, continue on to the next step. An example of the error may be:
$ mup setup

Started TaskList: Setup Docker
[study-dojo.me] - Setup Docker
[study-dojo.me] - Setup Docker: SUCCESS

Started TaskList: Setup Meteor
[study-dojo.me] - Setup Environment
[study-dojo.me] - Setup Environment: SUCCESS

Started TaskList: Setup Mongo
[study-dojo.me] - Setup Environment
[study-dojo.me] - Setup Environment: SUCCESS
[study-dojo.me] - Copying Mongo Config
[study-dojo.me] - Copying Mongo Config: SUCCESS

Started TaskList: Start Mongo
[study-dojo.me] - Start Mongo
[study-dojo.me] - Start Mongo: SUCCESS

Started TaskList: Setup proxy
[study-dojo.me] - Setup Environment
[study-dojo.me] - Setup Environment: SUCCESS
[study-dojo.me] - Pushing the Startup Script
[study-dojo.me] - Pushing the Startup Script: SUCCESS
[study-dojo.me] - Pushing Nginx Config Template
[study-dojo.me] - Pushing Nginx Config Template: SUCCESS
[study-dojo.me] - Pushing Nginx Config
[study-dojo.me] - Pushing Nginx Config: SUCCESS
[study-dojo.me] - Cleaning Up SSL Certificates
[study-dojo.me] - Cleaning Up SSL Certificates: SUCCESS
[study-dojo.me] - Configure Nginx Upstream
[study-dojo.me] - Configure Nginx Upstream: SUCCESS

Started TaskList: Start proxy
[study-dojo.me] - Start proxy
[study-dojo.me] x Start proxy: FAILED

	      ------------------------------------STDERR------------------------------------
	      Error response from daemon: endpoint mup-nginx-proxy not found
	Error response from daemon: network mup-proxy not found
	Error: No such container: mup-nginx-proxy-letsencrypt
             :
             :
$
Second, invoke:
$ mup reconfig
You should get a similar output to the following:
$mup reconfig

Started TaskList: Configuring App
[study-dojo.me] - Pushing the Startup Script
[study-dojo.me] - Pushing the Startup Script: SUCCESS
[study-dojo.me] - Sending Environment Variables
[study-dojo.me] - Sending Environment Variables: SUCCESS

Started TaskList: Start Meteor
[study-dojo.me] - Start Meteor
[study-dojo.me] - Start Meteor: SUCCESS
[study-dojo.me] - Verifying Deployment
[study-dojo.me] - Verifying Deployment: SUCCESS
$
If mup setup failed, then invoke mup setup again before invoking the next command.
Lastly, invoke:
$ mup deploy
Note. That mup deploy may take a while to finish.
ESLint
You can verify the code follows our coding standard by invoking ESLint with the following code:
$ meteor npm run lint
Directory Structure
The top-level directory structure is:
app/			# holds the Meteor application sources
config/			# holds configuration files, such as settings.development.json
doc/			# holds documentation files, user guides, etc.
The app/ directory structure is:
client/
  main.html		# Boilerplate HTML with a "root" div to be maniuplated by React
  main.js		# import startup files

imports/
  api/			# Define collections
  startup/		# Define code to run on startup
  ui/
    components/		# Contains page elements
    layouts/		# Contains top-level layout
    pages/		# Contains components for each page

node_modules/		# Filled with packages that are managed by npm

public/			# Can be filled with static assets

server/
  main.js		# Import server-side js files

tests/			## Implementation of testcafe to test code
Note on Import Conventions. This system adheres to the Meteor guideline of putting all application code in the app/imports/ directory, and using client/main.js and server/main.js to import the appropriate code.
Community Feedback
We would like to hear from you! If you liked or disliked your experience while using Study Session Planner, feel free to fill out this feedback form. It only takes a few minutes, and any feedback is much appreciated. Here’s what a few people who tried out our website had to say:
-
“I would like to have more status choices. Overall, I think the point of the website would be good if there were more grasshoppers using it” - John
-
“I had difficulty logging in, but once I was able to, it was easy to navigate the website. The overlay looks decent” - Melvin
-
“Creating an account was difficult because there is only a text link that is not very visible. Also, you have to click the calendar icon instead of anywhere in the text box to put in a date for add session. “ - Ryan
-
“The site was easy to navigate, but there were some technical issues” - Emily
-
“The home page was nice, but I think the color could be a bit different. Maybe add some dark green for school pride.” - Amy
Development History
Completed Issues for Milestone 1
See the project board “M1” for a list of issues completed for milestone 1.
Completed Issues for Milestone 2
See the project board “M2” for a list of issues completed for milestone 2.
Completed Issues for Milestone 3
See the project board “M3” for a list of issues completed for milestone 3.
Contact Us
You can email the creators of Study Dojo at:
darnellg@hawaii.edu
jryoung@hawaii.edu
kevinq22@hawaii.edu
marj8@hawaii.edu